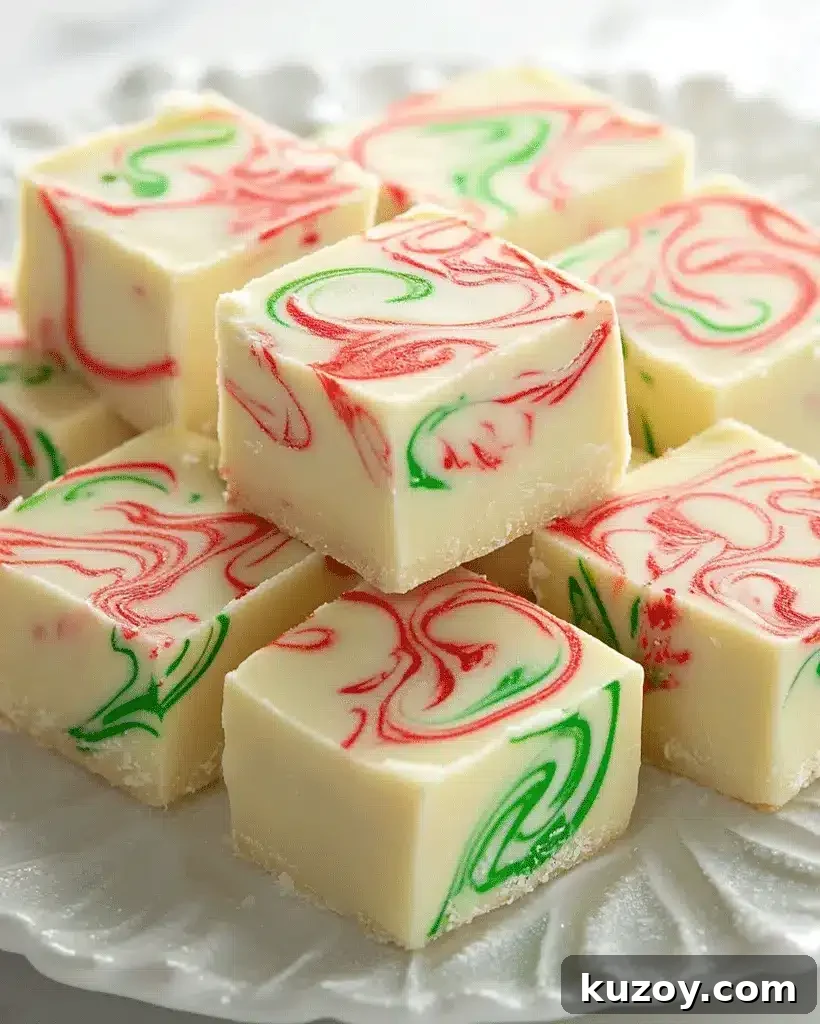
Hello, holiday bakers and candy makers! The season for cozy kitchens and sweet treats is here. This White Chocolate Christmas Fudge is a creamy, colorful confection that brings festive cheer to any dessert table. Whether you’ve never made fudge before or you’re an experienced candy crafter, this straightforward recipe will walk you through each step so your fudge looks as delightful as it tastes. Ready to make some Christmas fudge magic?
Introduction
White Chocolate Christmas Fudge is a holiday favorite thanks to its rich, melt-in-your-mouth texture and bright red-and-green marbling. This version uses simple ingredients and an easy technique to create show-stopping pieces perfect for gatherings, gifting, or holiday dessert platters. The recipe highlights the smooth flavor of white chocolate while letting you customize colors and toppings to suit your celebration.
Fudge has long been a beloved confection, and this festive take updates the classic with holiday colors and optional sprinkles for extra sparkle. It’s quick to prepare, requires minimal equipment, and stores well, making it an ideal make-ahead treat for busy holiday schedules.
Ingredients for White Chocolate Christmas Fudge
Gather these ingredients before you begin. Using quality components makes a noticeable difference in texture and flavor.
- 3 cups white chocolate chips — choose good-quality chips or chopped white chocolate for the creamiest result.
- 1 (14-ounce) can sweetened condensed milk — this creates the smooth, fudgy base.
- 1/2 teaspoon vanilla extract — enhances and rounds the flavor.
- Red and green food coloring — gel coloring is recommended for vibrant hues without thinning the mixture.
- 1/4 cup holiday sprinkles (optional) — for a festive finish added before chilling.
How to Make White Chocolate Christmas Fudge – Step by Step
This recipe requires about 10 minutes of active prep time and a few hours to chill. Follow the steps below for smooth, evenly colored fudge.
Step 1: Prepare the Pan
Line an 8×8-inch baking dish with parchment paper, leaving an overhang for easy removal once the fudge sets.
Step 2: Melt the Chocolate
In a medium heavy-bottomed saucepan, combine the white chocolate chips and sweetened condensed milk. Warm gently over low heat, stirring constantly until the chocolate melts completely and the mixture becomes smooth and silky. Remove from heat and stir in the vanilla extract.
Step 3: Divide and Color the Fudge
Transfer the melted mixture into three separate bowls. Add a few drops of red food coloring to one bowl and green to another, leaving the third bowl plain. Stir each portion until the color is evenly distributed. Start with a small amount of gel coloring and add more if needed to reach your desired intensity.
Step 4: Layer and Swirl
Pour the red layer into the prepared pan and spread it evenly. Gently spoon the plain white layer over the red, then top with the green layer. Use a knife or skewer to swirl the layers together to create a marbled, festive pattern.
Step 5: Add Sprinkles (Optional)
Scatter sprinkles across the top while the fudge is still soft so they adhere as it sets.
Step 6: Chill and Cut
Refrigerate the pan for at least 2 hours or until firmly set. Use the parchment overhang to lift the fudge from the pan. Cut into squares with a sharp knife, wiping the blade between cuts for clean edges.
Helpful Tips for Perfect Fudge
- Use quality white chocolate. Higher-quality chocolate melts more smoothly and yields a creamier texture.
- Control the heat. Melt the chocolate slowly over low heat to avoid scorching or seizing.
- Choose gel coloring. Gel food colorings deliver vivid shades without changing the mixture’s consistency.
- Swirling technique. Don’t over-swirl — a few gentle passes create an attractive marbled look without muddying the colors.
Serving Suggestions
- Pair with warm drinks. Serve the fudge with hot cocoa, coffee, or spiced tea to balance the sweetness.
- Holiday dessert board. Include the fudge with cookies, peppermint bark, and other seasonal confections for a festive spread.
- Gifts from the kitchen. Package squares in small boxes or cellophane bags tied with ribbon for charming homemade gifts.
Nutritional Information
Estimated per-serving values (approximate):
- Calories: 130
- Fat: 6g
- Saturated Fat: 4g
- Carbohydrates: 18g
- Sugar: 16g
- Protein: 2g
Storage
- Refrigerator: Store in an airtight container for up to one week.
- Freezer: Wrap tightly and place in a freezer-safe container for up to three months. Thaw in the refrigerator overnight.
- Serving: If you prefer a softer texture, let chilled fudge sit at room temperature for 10–15 minutes before serving.
FAQs
Can I use dark or milk chocolate instead? Yes — substitute equal parts of milk or dark chocolate for a different flavor profile. Colors will be less vivid.
Can I add flavorings? Absolutely. Try a small amount of peppermint extract, almond extract, or citrus zest to complement the white chocolate.
Is food coloring necessary? No. The fudge is delicious plain; colors are purely decorative.
Conclusion
This White Chocolate Christmas Fudge is a simple, festive treat that’s perfect for holiday entertaining or gift-giving. With minimal ingredients and straightforward steps, you can create creamy, colorful fudge that looks impressive and tastes indulgent. Enjoy the process and have fun personalizing the colors and toppings for your holiday celebrations. Happy holidays and happy baking!
White Chocolate Christmas Fudge – Festive Holiday Treat
Author: Patricia